
Vintage Upcycle
Welcome to the first of our regular upcycling ‘how to’ features
Ηave you ever looked at an upcycled piece of furniture and thought ‘I’d love to do that’ – but have no idea where to start? Yep, us too!
Which is why we’ve started our new regular series of ‘how-to’ features! They’re step-by-step guides to upcycling, complete with all the info you need, including paint type, how to prep, and other important hints and tips. So, go on, what are you waiting for? Get upcycling!
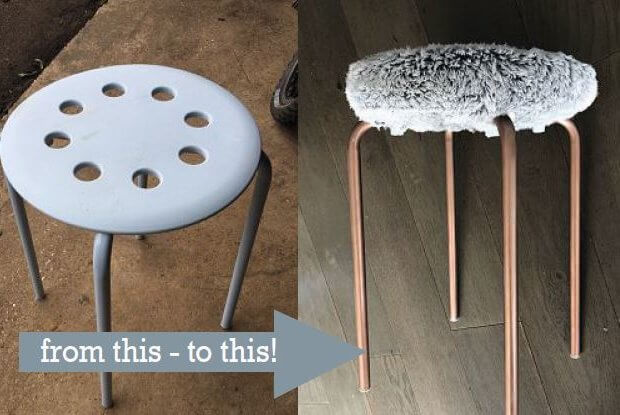
For our first feature, we’re taking a look at how to upcycle a stool. Our Editor Clare saw a stool she loved in a catalogue, but at more than £200 it was a bit steep. So, she decided to make her own. Here’s how she did it…
How to
The stool was lovely and would have been the perfect addition to my newly finished bedroom. The trouble was, at £200, it was a bit pricey – especially after all the money we’d spent getting the bedroom decorated in the first place! So, I had an idea. Why not try making my own?
Now I’m no craft expert. In fact, I’d go as far as to say I’m a bit useless when it comes to these sorts of things. But that just goes to show – if I can do it, anyone can!
Step one
Buy/choose a stool. If you already have one to upcycle then great. But if you’re thinking of buying a cheap one to upcycle then you need to think what you want to do with it. The stool I’d seen and loved had copper legs and a fluffy top, so I needed something I could easily cover and something with legs that could be easily painted. As luck would have it, I found this simple Ikea stool for just £2 from the Aston Clinton recycling centre (you can actually buy it new from Ikea for £4). The top was plastic, which wasn’t perfect as I knew I’d need to attach fabric to it, but the legs were metal and I knew they could be easily sprayed. I was on my way!
TIP: A wooden seat will be easier if you’re stapling the fabric to it, as the staples will go straight into the wood.
Step two
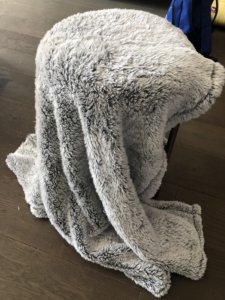 Buy your materials. This takes some planning. I knew I wanted to paint the legs, but I wasn’t sure what sort of paint to go for. Luckily, my friend Sandra did – copper spray paint! I also needed to pad the seat out and find some fluffy fabric to attach. Here’s what I used (apart from the stool):
- A fluffy throw from a charity shop, £5
- Foam pad, 40x40x4cm, £6, Hobbycraft
- Copper spray paint, £7.95, Berkhamsted Arts and Crafts
- Glue gun and glue (I already had)
- Staple gun (I already had)
Step three
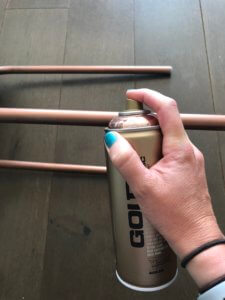 First, spray the legs. It’s best to paint on anything else. Give the legs a quick rub with sandpaper if you have some, and make sure they’re clean. Then, keeping your mouth and nose covered, spray the paint evenly all over the legs. It goes on fairly easily, and only takes a few moments to dry.
I used copper, but you can use silver or gold as well – or any colour you fancy!
Step four
Once the paint is dry, cut the foam pad to shape. Tip the stool upside down and draw around the seat, then cut out the shape with scissors or a knife. Glue it firmly onto the top of the stool.
TIP: Use plenty of glue. You don’t want the seat shifting around when you sit on it!
 Step five
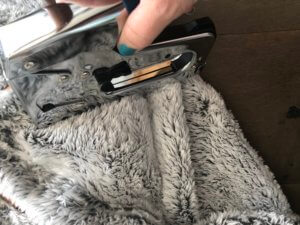
Attach the faux fur to the seat. This is where it’s easier if you have a wooden seat as you can carefully staple it straight into the wood. Because I had a plastic seat, I had to attach a piece of wood to the underside 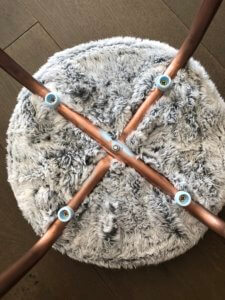 of the stool to staple into. Pull the fabric tight, and go carefully round, stapling as you go.
TIP: Furry/fluffy material is probably the easiest kind to use as it’s more forgiving if your stapling isn’t very neat. But you can use whatever takes your fancy!
And that’s it! It really is as easy as it sounds, especially if you have a wooden seat. It looks amazing – and cost a fraction of the one I saw!
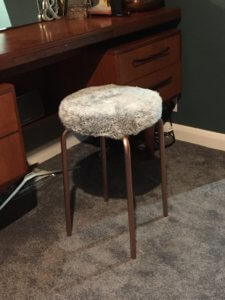
Cost of original stool: £200
Cost of upcycled stool: £20.95 – and I have fabric and paint left over if I want to make another one!
Saving: £179.05!